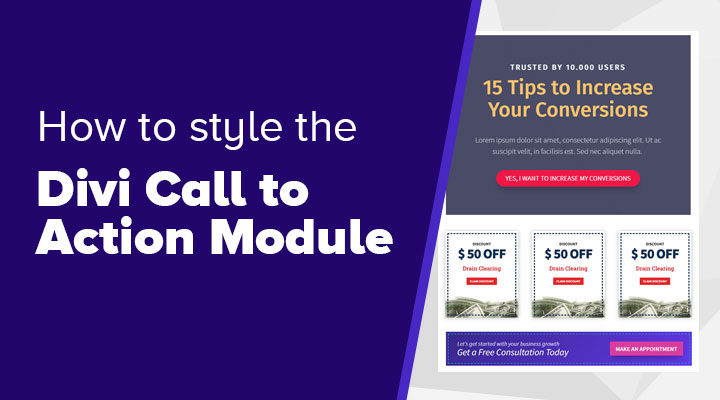
With the Divi call to action module you can create some create CTA boxes for your website which will help to increase your conversions.
In this tutorial, I will be showing you 3 different CTA boxes and how you can create them.
You can find the demo’s right here.
Call to action box #1
In the first call to action box we are going to place a title, sub-title some body copy and a button. All of this can be created in the call to action module.

Step 1: Content tab
Start by placing the Call To Action module on your page.
Fill in the fields as in the image.
The “15 Tips to Increase Your Conversions” title is a h3.
Also place an URL under Link, otherwise your button will not show up.
I have used #434462 as my background color.

Step 2: Design tab
Title Text (h2)
- Title Font: Fira Sans
- Title Font Style: Uppercase
- Title Text Size: Desktop: 20px, Mobile: 16px
- Title Letter Spacing: 3px
Body Text
- Body Font Weight: Light
- Body Text Color: rgba(255,255,255,0.73)
- Body Text Size: Desktop: 20px, Mobile: 18px
- Body Line Height: 1.5em
Button
- Use Custom Styles For Button: Yes
- Button Text Size: Desktop: 18px, Mobile: 12px
- Button Text Color: #ffffff
- Button Background: #ef2140
- Button Background Hover: #d11d38
- Button Border Width: 0px
- Button Border Radius: 25px
- Button Font Style: Uppercase
- Show Button Icon: No
- Button Padding Desktop: 7px 7 px 25px 25px
- Button Padding Mobile: 7px 7 px 10px 10px
- Button Box Shadow: Top right option
Sizing
- Width Desktop: 60%
- Width Tablet, Mobile: 100%
Padding
- Padding Desktop: 75px 75px 75px 75px
- Padding Mobile: 75px 75px 25px 25px
Step 3: Advanced tab
CSS ID & Classes
- CSS Class: cta_box_1
Step 4: CSS
Place the following CSS in Divi > Theme Options > CSS or in your child theme CSS file.
/* ### CTA BOX 1 ### */

.cta_box_1 h3 {
  	font-size: 54px;
  	color:#fbc562 !important;
  	padding-top:5px;
  	padding-bottom: 35px;
  	font-family: 'Fira Sans',Helvetica,Arial,Lucida,sans-serif !important;
  	line-height:1.1em;
}

.cta_box_1 .et_pb_promo_description  {
  	padding-bottom:35px;
}

@media only screen and ( max-width: 479px ) {
.cta_box_1 h3 {
	 font-size: 36px;
}}
Call to action box #2
The next call to action box is a discount box. We will be starting with some row and column settings.

Step 1: Row settings
I am using a 3 column structure with a total width of 1240px. In each column I will be placing a Call To Action Module.
Column Settings: Content Tab
- Add an image for the bottom.
- Background Image Size: Actual Size
- Background Image Position: Bottom Center

Column Settings: Design Tab
- Spacing: 10px 10px 10px 10px
- Box Shadow: First option
Step 2: Content tab
Start by placing the Call To Action module in a column.
And fill in the fields.
The “$ 50 OFF” title is a h3.
Also place an URL under Link, otherwise your button will not show up.

Step 3: Design tab
Title Text (h2)
- Title Font: Source Sans Pro
- Title Font Weight: Bold
- Title Font Style: Uppercase
- Title Text Color: #000000
- Title Text Size: 20px
Body Text
- Body Font: Roboto Slab
- Body Text Color: #c60505
- Body Text Size: 28
- Body Line Height: 1.5em
Button
- Use Custom Styles For Button: Yes
- Button Text Size: 16
- Button Text Color: #ffffff
- Button Background: #e02b20
- Button Background Hover: #a81515
- Button Border Width: 0px
- Button Font Weight: Bold
- Button Font Style: Uppercase
- Show Button Icon: No
- Button Margin Top: 15px
- Button Padding Top and Bottom: 5px
Padding
- Padding Bottom: 150px
- Padding Left and Right: 25px
Border
- Round Corners: 4px
- Border Width: 5px
- Border Color: #01254c
- Border style: Dashed
Step 4: Advanced tab
CSS ID & Classes
- CSS Class: cta_box_2
Step 5: CSS
Place the following CSS in Divi > Theme Options > CSS or in your child theme CSS file.
/* ### CTA BOX 2 ### */

.cta_box_2 h2 {
	padding-bottom: 0px;
}

.cta_box_2 h3 {
  	font-size: 70px;
  	color:#01254c !important;
  	line-height:1.1em;
	font-weight: 800;
	letter-spacing: -3px;
	padding-bottom: 25px;
}

@media only screen and ( max-width: 479px ) {
.cta_box_2 h3 {
	 font-size: 54px;
}}
Call to action box #3 (desktop version)
The last call to action box is actually not created with the call to action module but with a text and a button module.
For this one we will be making 2 variatons. One for desktop and one for mobile.
We going to start with the desktop version.

Step 1: Row Settings
I am using a row with one column structure and a max-width of 750px. In this row place a text module and below a button module.
Step 2: Text Module Content Settings
“Get a Free Consultation Today” is a h4 title.

For the background I am using a gradient color. The dark blue is #341488 and the lighter blue is #6011ec.
The gradient direction is set to 135deg.

Step 3: Text Module Design Settings
Text
- Text Font Style: italic
- Text Color: rgba(255,255,255,0.8)
- Text Size: 18px
Heading Text h4
- Heading 4 Text Color: #ffffff
- Heading 4 Text Size: 28px
Spacing
- Padding: 25px 18px 35px 35px
- Heading 4 Text Size: 28px
Step 4: Text Module Advanced Settings
Custom CSS
- Add the following in the main element field.
outline: 2px dashed #1c9cbf;
outline-offset: -8px;
Visibility
- Disable on: Check mobile and tablet
Step 5: Button Module Content Tab
Give your button a title and link.
Step 6: Button Module Design Tab
Button
- Use Custom Styles For Button: Yes
- Button Text Size: 18
- Button Text Color: #ffffff
- Button Background: #da359d
- Button Border Width: 0px
- Button Border Radius: 2px
- Button Font Weight: Semi-Bold
- Button Font Style: Uppercase
- Show Button Icon: No
- Button Margin Top and Bottom: 0px
- Button Padding Top: 8px
Transform
- Transform translate x ass: 500px
- Transform translate y ass: -95px

Step 7: Button Module Advanced Tab
Visibility
- Disable on: Check mobile and tablet
Call to action box #3 (mobile version)
The mobile version we are going to build with the call to action module again.

Step 1: Content Tab
in the image below how I filled in the fields. Also add a link for the button otherwise it will not show up.
The background is the same as for the desktop version. The dark blue is #341488 and the lighter blue is #6011ec.
The gradient direction is set to 135deg.

Step 2: Design Tab
Text
- Text Allignment: center
- Text Color: light
Title Text H2
- Title Font Weight: Light
- Title Text Color: #ffffff
- Title Text Size: Desktop 18px, Mobile 16px
Body Text
- Body Font Weight: Bold
- Body Text Color: #ffffff
- Body Text Size: 24px
Button
- Use Custom Styles For Button: Yes
- Button Text Size: 18
- Button Text Color: #ffffff
- Button Background: #da359d
- Button Border Width: 0px
- Button Border Radius: 2px
- Button Font Weight: Semi-Bold
- Button Font Style: Uppercase
- Show Button Icon: No
Spacing
- Margin Bottom: 50px
Step 3: Advanced Tab
Visibility
- Disable on: Check desktop
If you have any questions let me know in the comments.


