


If you’ve noticed the “Not Secure” warning on your website when viewed in Chrome, don’t panic. This guide will walk you through fixing it quickly and easily. The warning appears because Chrome wants to protect users by flagging websites that don’t use HTTPS, which secures the connection between the browser and your site.
Let’s dive into the steps to resolve this issue and ensure your site is safe and secure.
What Does “Not Secure” Mean?
The “Not Secure” warning means your site is using HTTP instead of HTTPS. HTTPS (Hypertext Transfer Protocol Secure) encrypts the data exchanged between the user’s browser and your website, preventing hackers from intercepting sensitive information.


Since September 2023 Chrome has changed how it shows whether a site is secure. Instead of the old padlock icon, you’ll now see a tune icon. Don’t worry, though — this still means your connection is secure (if it’s HTTPS). If you want more details, just click on the icon, and Chrome will give you info about the security status of the website. It’s part of Chrome’s effort to keep things clean and easy to understand while still keeping you safe!
Step-by-Step Guide to Fixing the Issue
1. Purchase and Install an SSL Certificate
First, you need to get an SSL certificate, which enables HTTPS. You can purchase one from hosting providers or get a free option from Let’s Encrypt.
Once you have it, follow these steps:
- Install the certificate via your hosting control panel or ask your hosting provider to install it.
- For WordPress users, you can use plugins like Really Simple SSL to simplify the process.
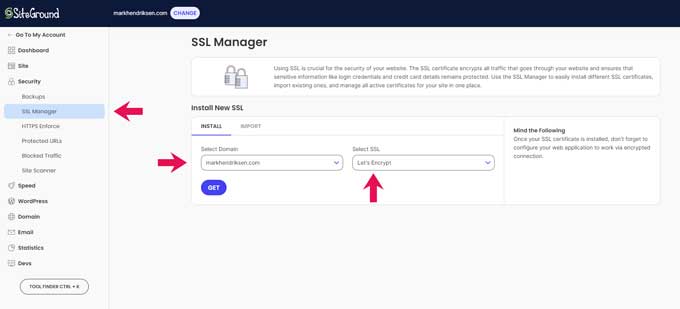
Example with SiteGround
Installing an SSL certificate on SiteGround is straightforward.
From your Site Tools, head over to Security > SSL Manager.
Select your domain, and in the ‘Select SSL’ dropdown, choose ‘Let’s Encrypt’.
After that, click Get, and SiteGround will handle the rest. It’s a quick and easy way to secure your website with just a few clicks.
2. Update Website URLs to HTTPS
Once your SSL certificate is installed, you need to make sure your website URLs use HTTPS:
- Update internal links, scripts, and images to load over HTTPS.
- Set up 301 redirects so visitors automatically go to the HTTPS version.
- You can use plugins or manually update the .htaccess file for redirection.
For WordPress users, after installing an SSL certificate, ensure that your website is being served over HTTPS.
To do this:
- Go to Settings > General in your WordPress dashboard.
- Check both the WordPress Address (URL) and Site Address (URL) fields.
- Make sure the URLs start with “https://” instead of “http://”.
- If they don’t, manually add the “s” to both URLs and save the changes.

3. Check for Mixed Content
Mixed content occurs when your webpage loads resources like images, scripts, or styles over HTTP, even though the page is served over HTTPS. This causes security warnings. Use Chrome DevTools or a mixed content scanner such as “Why No Padlock” to identify and fix these issues. Ensure everything loads over HTTPS.
4. Verify Your SSL Installation
To confirm everything is working:
- Use SSL testing tools like SSL Labs to check if your certificate is correctly installed.
- In Chrome, click the padlock icon in the address bar. If you see “Connection is secure,” you’re good to go.
5. Update Google Search Console and Analytics
Don’t forget to update your settings in Google Search Console and Analytics. You’ll need to:
- Add the HTTPS version of your website to Search Console.
- Update your site’s URL in Google Analytics to reflect the new HTTPS version.
Common Issues and Solutions
- Mixed Content Warnings: As mentioned earlier, mixed content can trigger warnings even with HTTPS. Ensure all resources (CSS, JS, images) are loaded via HTTPS.
- Expired SSL Certificate: SSL certificates expire, so make sure to renew them on time to avoid the “Not Secure” warning reappearing.
Why HTTPS is Important
Switching to HTTPS does more than just remove the “Not Secure” warning:
- Security: Encrypts data and protects users from attacks.
- SEO: Google favors secure websites, giving HTTPS sites a ranking boost.
- Trust: Users are more likely to trust and engage with your site when they see it’s secure.
FAQs
Visitors will be warned about the risks of using your site, potentially driving them away. Google may also penalize your rankings.
Yes! Let’s Encrypt offers free SSL certificates, and they are a great option for most small websites.
SSL is the older version of the encryption protocol, while TLS (Transport Layer Security) is the more updated and secure version. Today, SSL certificates are actually TLS certificates.
Conclusion
Fixing the “Not Secure” warning is essential for building trust with your audience and ensuring your website performs well. By following these steps, you can make sure your website is secure and offers a safe browsing experience for all users.
So, get started today with installing an SSL certificate and enjoy the benefits of a fully secure website!
