


Typography plays a crucial role in web design, and having the right font size can make or break your site’s readability and user experience. In this article, we’ll explore various ways to change the font size in WordPress, making it easy for you to tweak your site’s typography to perfection
Table of Content
Understanding Font Size in WordPress
Before diving into the how-to, let’s get on the same page about what font size is and why it matters. Font size, simply put, is the size of your text. It affects how easily your content can be read and how it appears visually. WordPress themes come with default font sizes, but they might not always fit your needs. So, let’s see how we can change that!
Methods to Change Font Size in WordPress
There are several ways to change font size in WordPress, depending on your preference and the tools you’re comfortable using. Here, we’ll go through each method step by step.
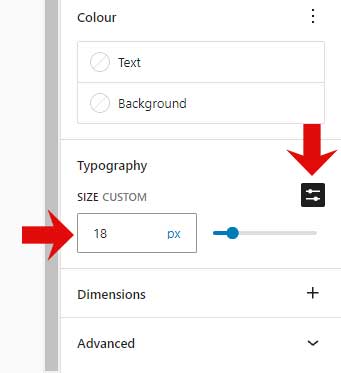
Using the WordPress Editor (Block Editor)
The WordPress Block Editor, also known as Gutenberg, makes it easy to adjust font sizes directly within your posts and pages. Here’s how you do it:
- Open a Post or Page: First, navigate to any post or page you want to edit.
- Select the Text Block: Click on the text you want to change. You should see a toolbar pop up.
- Adjust Font Size: In the right-hand sidebar under ‘Typography,’ you’ll find an option to adjust the font size. You can select a preset size or enter a custom value.
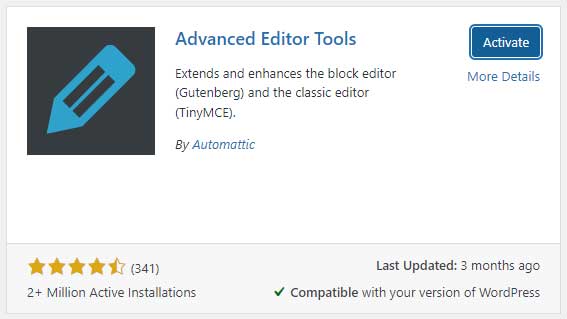
Using Classic Editor
If you’re still using the Classic Editor, you can also change font sizes, though it’s slightly different from the Block Editor. Here’s how:
First, you have to install the Advanced Editor Tools plugin (previously TinyMCE Advanced).
Go to Plugins and choose Add New. Search for Advanced Editor Tools and start installing it. After the installation has finished click on Activate.
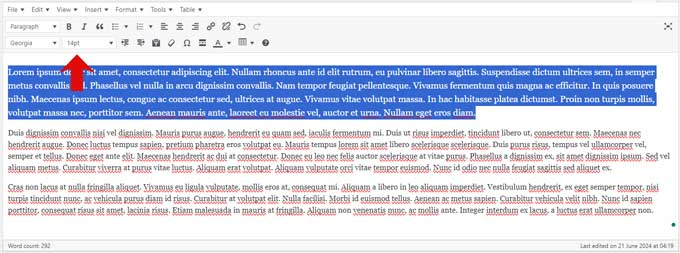
When you open a Page or Post your editor will now have additional options.
Highlight the text you want to resize and you can change the font size.
Changing Font Size Using WordPress Themes
Some themes offer built-in options to change font sizes without touching a line of code. Here’s how you can leverage these features.
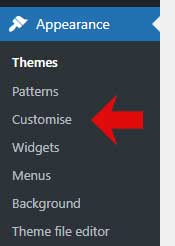
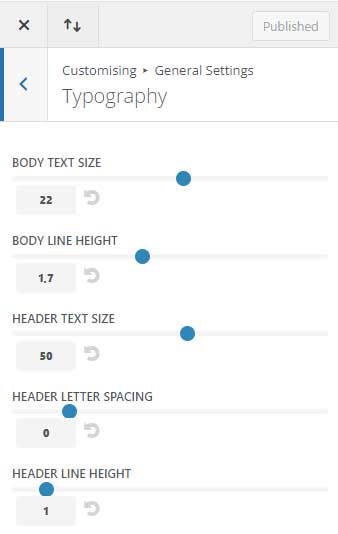
Theme Customizer
Many themes include font size settings within the WordPress Customizer, providing a user-friendly way to make changes.
- Access Customizer: Go to
Appearance > Customisefrom your WordPress dashboard. - Find Typography Settings: Look for a section labeled ‘Typography’ or ‘Fonts.’
- Adjust Font Size: Here, you can change the font size for various elements like headings, body text, etc.
Theme Options Panel
Some themes come with their own settings panel, which can offer even more customization options.
- Navigate to Theme Options: This is usually found under
Appearance > Theme Options. - Adjust Font Settings: Look for font or typography settings to adjust the font size.
Using WordPress Plugins to Change Font Size
Plugins can be a lifesaver when you need extra functionality. There are several plugins specifically designed to help you change font sizes.
Recommended Plugins
- Advanced Editor Tools plugin (previously TinyMCE Advanced): Enhances the classic editor with more formatting options.
- Simple Custom CSS: Allows you to add custom CSS to your site.
Installation and Usage
- Install Plugin: Go to
Plugins > Add Newand search for the plugin. - Activate and Configure: Once installed, activate it and follow the plugin’s instructions to change font sizes.
Custom CSS for Font Size Changes
For those comfortable with a bit of coding, custom CSS offers precise control over your site’s font sizes. Here’s a simple guide to get you started.
Introduction to Custom CSS
CSS (Cascading Style Sheets) is a powerful tool that allows you to apply custom styles to your site, including font sizes.
Adding Custom CSS in WordPress
- Access Customizer: Go to
Appearance > Customise > Additional CSS. - Add CSS Code: Enter your custom CSS code. For example:
p { font-size: 18px; }
Best Practices for Font Sizes
Choosing the right font size isn’t just about aesthetics; it’s about creating a great user experience. Here are some best practices to keep in mind.
Accessibility Considerations
- Ensure your font size is readable for all users, including those with visual impairments.
- A good rule of thumb is to keep body text at least 16px.
Design Consistency
- Maintain a consistent font size across your site to create a cohesive look.
- Use headings (H1, H2, H3, etc.) to establish a clear hierarchy.
Troubleshooting Common Issues
Sometimes things don’t go as planned. Here are some common issues you might encounter and how to fix them.
Font Size Not Changing
- Clear your site’s cache to see changes.
- Check for conflicting styles in your theme or plugins.
Conflicts with Theme/Plugins
- Disable plugins one by one to identify conflicts.
- Consult your theme’s documentation or support for specific guidance.
Conclusion
Changing the font size in WordPress doesn’t have to be a headache. Whether you use the block editor, classic editor, customizer, or plugins, there’s a method that will work for you. Now, go ahead and tweak those fonts to make your content shine!
Additional Resources
- Further Reading: Check out our articles on Typography and Fonts.
- External Resources: Explore more tools and guides on CSS tricks and WordPress.org.
By following this guide, you’ll have the flexibility to adjust your WordPress site’s font sizes, ensuring your content is both readable and visually appealing. Happy customizing!
