



















Divi 5 has introduced a huge number of new features and improvements. While some updates get plenty of attention, others are easy to overlook.
I've been working with Divi 5 for quite some time, and I'm still discovering useful settings I didn't even know existed.
Some of these features can improve your website's appearance, while others can make everyday design tasks much easier.
In this tutorial, I'll show you 10 lesser-known Divi 5 features, including collapsible mobile menus, backdrop blur, gradient text effects, image cropping controls, form styling improvements, and powerful design variable tools.
The best part? You can use all ten features directly inside the Divi 5 Visual Builder, without writing custom CSS.
Table of Contents
- Create a Collapsible Mobile Menu Without Custom Code
- Create Glass Effects With Backdrop Blur
- Use the New Slider Navigation Controls
- Fill Text With Gradients, Images, and Outlines
- Control Image Cropping and Focal Points
- Create Magazine-Style Typography
- Display Real Field Labels in Contact Forms
- Style Form Focus States Without CSS
- Right-Click Any Supported Setting to Convert It Into a Variable
- Generate Color Harmonies and Color Scales
Watch the Video: 10 Hidden Divi 5 Features
In the video above, I demonstrate each feature and show you where to find its settings. If you prefer written instructions, you can follow the explanations below.
1. Create a Collapsible Mobile Menu Without Custom Code
One of the most useful recent additions to Divi 5 is the Collapsible Mobile Menu option.
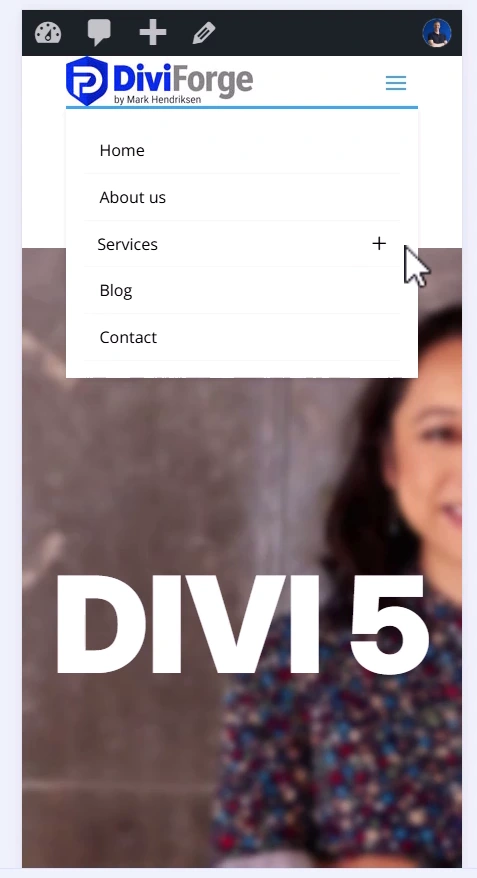
If you've ever created a website with multiple levels of navigation, you know that mobile menus can become quite long.
Previously, creating collapsible submenus often required custom CSS, JavaScript, or a third-party plugin.
Divi 5 now includes this functionality directly in the Menu module.
How to enable the collapsible mobile menu
- Open your Menu module in the Visual Builder.
- Go to Design → Collapsible Mobile Menu.
- Enable the collapsible menu option.
- Adjust the available submenu and toggle styling options to match your design.
Now, when visitors open the mobile menu, they can expand and collapse individual submenus instead of seeing every navigation link at once.
This is especially useful for business websites, online stores, and other sites with large navigation menus.
Why it's useful: You get a cleaner mobile navigation experience without maintaining custom code.
2. Create Glass Effects With Backdrop Blur
Divi 5 includes a backdrop blur filter that makes creating modern, glass-like effects much easier.
You might already be familiar with the regular Blur filter, but there's an important difference between the two.
Regular Blur blurs the element itself, including its content.
Backdrop Blur blurs whatever appears behind the element, allowing the foreground content to remain sharp.
How to use backdrop blur in Divi 5
- Open the settings of the element you want to style.
- Go to Design → Filters.
- Find the Backdrop Blur option.
- Increase the blur amount until you achieve the desired effect.
For example, try applying a backdrop blur of around 10–15px to a semi-transparent element positioned over a background image.
The image behind the element becomes blurred, while the text inside remains clearly visible.

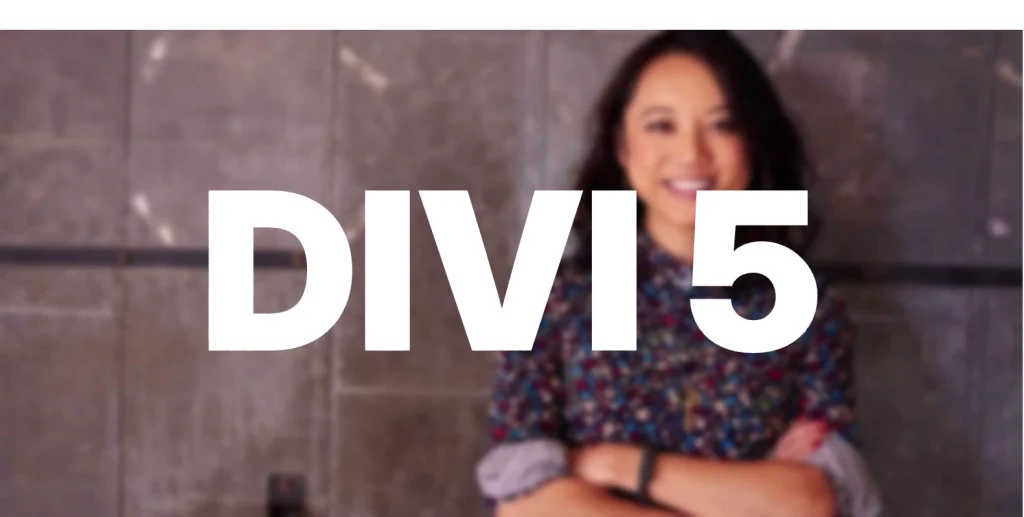
Where to use it: Backdrop blur is particularly effective for transparent headers, navigation bars, overlay panels, and cards positioned over images.
Tip: Make sure the element has a transparent or semi-transparent background so the backdrop effect is visible.
3. Use the New Slider Navigation Controls
Divi 5 also introduced new navigation options for the Slider module.
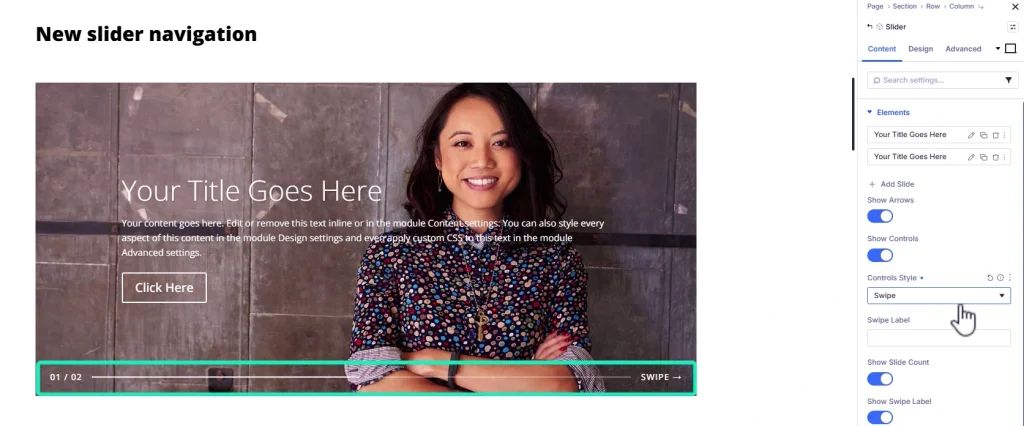
Instead of relying only on traditional navigation dots and arrows, you can now use a modern swipe-style navigation bar.
The new controls include:
- A segmented progress indicator.
- A slide counter displaying the current slide.
- A customizable swipe label.
How to change the slider navigation
Open your Slider module in the Visual Builder and find its navigation controls.
You can switch between traditional dot navigation and the newer swipe-style controls.
Once enabled, the slider displays a progress indicator that updates as visitors navigate between slides.
The slide counter also makes it easier to see how many slides are available.
These navigation options can give your sliders a more polished appearance without requiring an additional plugin.
Good to know: Newly created Divi 5 sliders use swipe-style controls by default, while sliders migrated from older versions of Divi can retain their traditional dot navigation.
4. Fill Text With Gradients, Images, and Outlines
This is one of my favorite design improvements in Divi 5.
You can now create beautiful text effects directly inside the Visual Builder.
Instead of relying on custom CSS, you can fill headings with gradients, images, or transparent colors combined with an outline.
Create gradient text

Open a Text or Heading module and go to the relevant text styling settings under the Design tab.
Find the Text Effects settings and change the Fill Type to Gradient.
You can now create a gradient that transitions between multiple colors.
For example, you could create:
- A pink-to-purple gradient running from top to bottom.
- A green-to-blue gradient running from left to right.
- A custom multicolor gradient matching your website's branding.
Create outlined text
For an outlined heading, change the Fill Type to Transparent.
Then increase the Stroke Width and choose a Stroke Color.
This creates hollow letters with visible outlines.
Outlined text works particularly well for large headings on dark backgrounds.
Fill text with an image
Another interesting option is Image Fill.
Change the Fill Type to Image and select a photograph from your Media Library.
Divi uses the image to fill the letters, creating a photographic text effect.

For the best results, use a large, bold font so the image has enough space to remain recognizable.
Why it's useful: You can create eye-catching hero headings and promotional designs while keeping your text editable.
5. Control Image Cropping and Focal Points
Have you ever added several images to a layout, only to discover that they all have different proportions?
This is especially common with product images, team member photographs, and blog post thumbnails.
Divi 5 includes improved image sizing and framing controls that make it easier to achieve a consistent appearance.
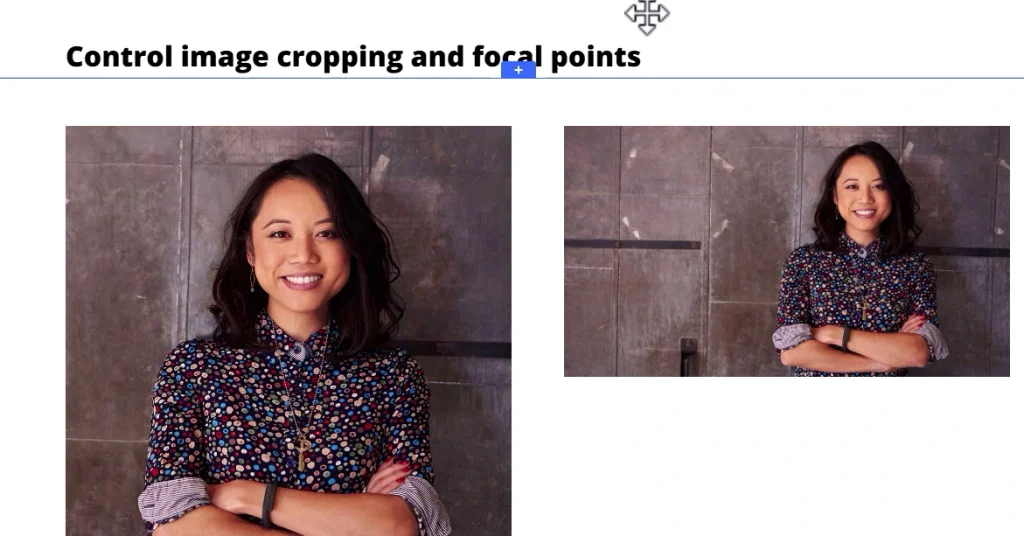
Step 1: Set an aspect ratio
Open an Image module and navigate to:
Design → Sizing → Aspect Ratio
Choose the aspect ratio you want to use.
For example:
- 1:1 creates a square image.
- 16:9 creates a widescreen image.
- 4:5 creates a portrait-oriented image.
Step 2: Change Object Fit to Cover
Next, open:
Design → Framing
Change Object Fit to Cover.
This makes the image fill the available space without stretching or distorting it.
Any parts of the original image that don't fit inside the frame will be cropped.
Step 3: Adjust the image position
You can also use Object Position to control which part of the image remains visible.
For example, if a person's face is being cropped, you can adjust the position to keep their face inside the frame.
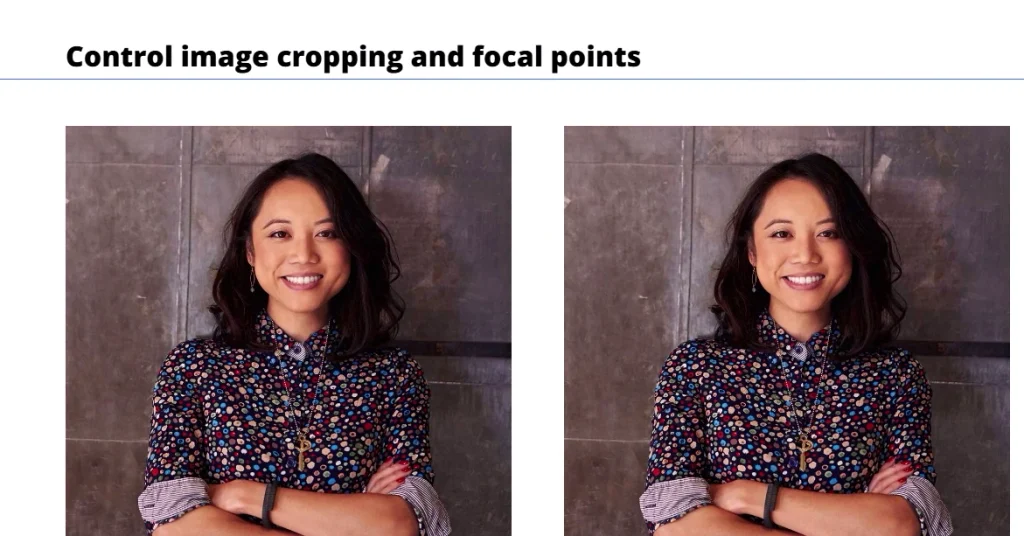
Why it's useful: These controls make it much easier to create consistent image grids without editing every image in Photoshop beforehand.
6. Create Magazine-Style Typography
Divi 5 includes several typography improvements that can help you create editorial and magazine-style layouts.
Two particularly interesting options are Text Columns and Drop Caps.
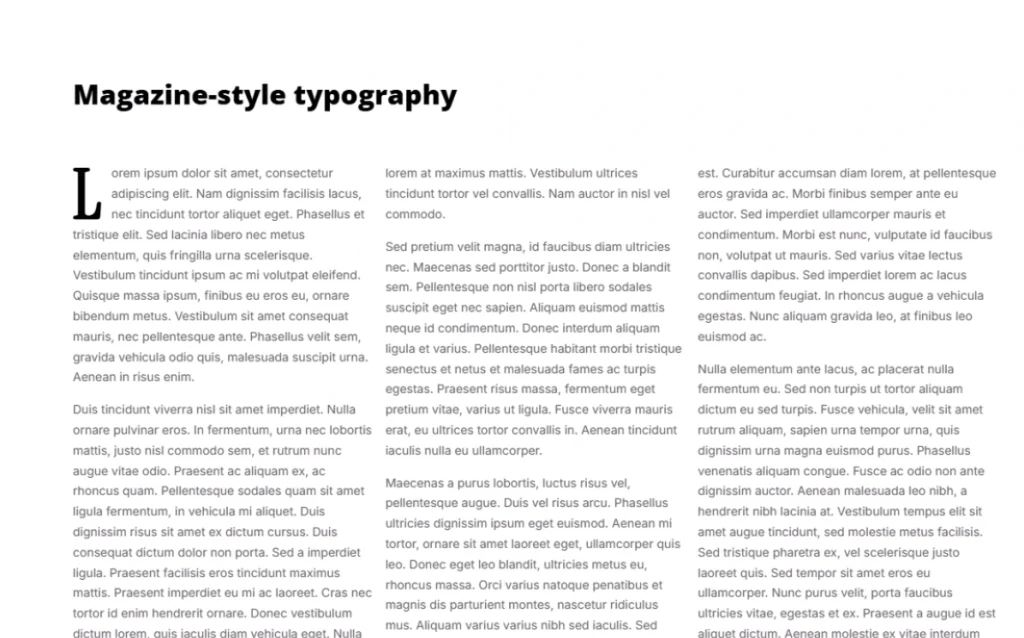
Create multiple text columns
Open a Text module and navigate to Design → Text.
Find the Text Columns setting and change it from one column to two or three.
Divi will automatically distribute the text across the columns.
You can also adjust the Text Columns Gap to control the spacing between them.
This means you don't need to create separate Divi columns and manually divide your text between multiple modules.
Add a drop cap
A drop cap is an oversized first letter at the beginning of a paragraph.
To create one, open the Drop Cap settings within the Text design options.
Adjust the Drop Cap Line Size to control how many lines the enlarged letter occupies.
For example, a line size of three creates a large first letter that extends across approximately three lines of text.
Combining multiple text columns with a drop cap creates a traditional editorial appearance.
Where to use it: This works particularly well for magazine-style pages, editorial content, introductions, and storytelling sections.
For mobile devices, I recommend switching back to a single text column for easier reading.
7. Display Real Field Labels in Contact Forms
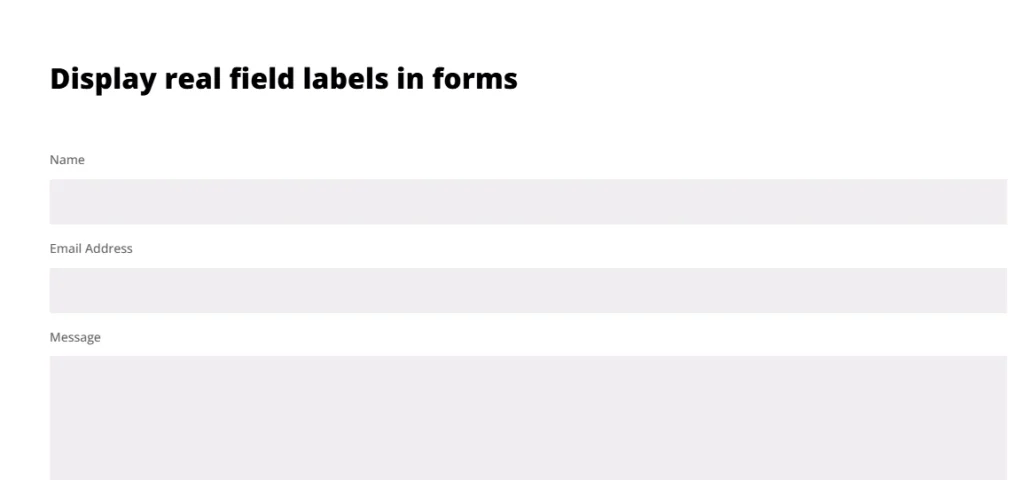
Here's a small improvement that can make your forms easier to use.
Traditionally, many Divi contact forms rely on placeholder text inside the input fields to explain what information visitors should enter.
The problem is that the placeholder disappears as soon as someone starts typing.
Divi 5 now includes a Show Labels option in the Contact Form module.
How to enable field labels
- Open the Contact Form module.
- Find the Show Labels option.
- Enable it to display labels above the form fields.
Your form now displays labels such as Name, Email Address, and Message above the corresponding inputs.
However, you might notice that the placeholder text is still visible inside the fields, creating duplicate text.
How to hide the placeholder text
There's an easy way to hide it without custom CSS.
Go to Design → Fields → Placeholder Text.
Find the Placeholder Text Color setting and reduce its opacity to 0%.
This makes the placeholder text invisible while keeping the actual field labels visible above the inputs.
The placeholder text remains in the underlying markup, but it is no longer visible.
Why it's useful: Visitors can still identify each field after they begin entering information, resulting in a cleaner and more understandable form.
8. Style Form Focus States Without CSS
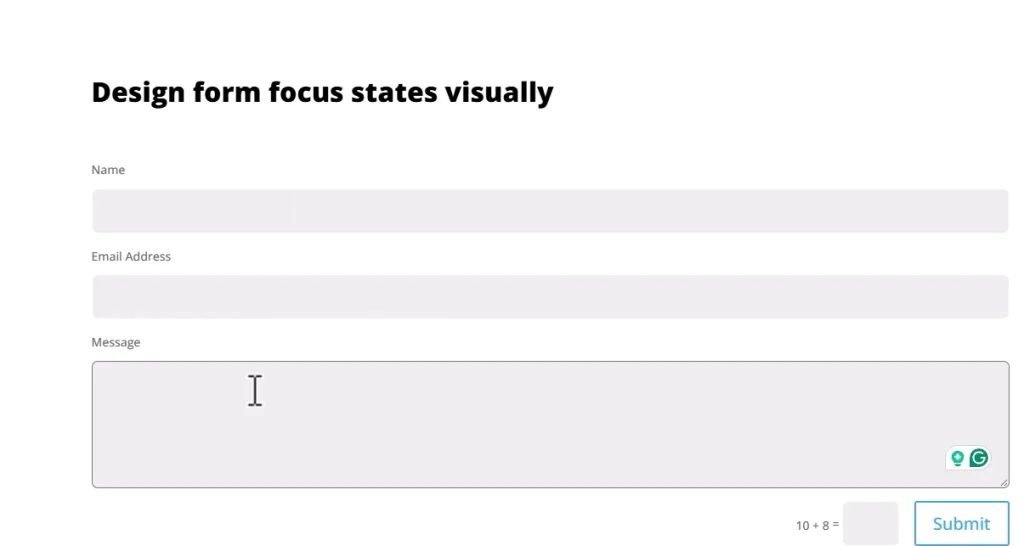
While we're working with contact forms, here's another useful Divi 5 feature.
You can now customize the appearance of form fields when visitors click or tab into them.
This is called the Focus state.
For example, you could change the border color of the active field to match your brand colors.
How to customize the Focus state
- Open your Contact Form module.
- Go to Design → Fields.
- Set up the border for the normal state.
- Switch to the Focus state using Divi's state controls.
- Change the border color to something more noticeable.
For example, you could use a purple border when a field is focused.
Important tip: Prevent fields from shifting
When adding a border to the Focus state, make sure the normal state uses the same border width.
Otherwise, the field dimensions may change slightly when someone clicks inside an input.
For example, use a 2px white border in the normal state and a 2px purple border in the Focus state.
This keeps the dimensions consistent while still providing visual feedback.
Why it's useful: Focus styling gives visitors a clear indication of which field is active, improving the overall form experience.
9. Right-Click Any Supported Setting to Convert It Into a Variable
Divi 5's Global Variables make it easier to maintain consistent colors, fonts, gradients, and other design values across your website.
But there's a shortcut you might not know about.
You can right-click a supported setting and convert its existing value into a reusable variable.
How to convert a gradient into a variable
Let's say you've created a background gradient that you want to reuse throughout your website.
Normally, you might open the Variable Manager and manually recreate the gradient.
Instead, you can:
- Open the element containing your gradient.
- Locate the existing Background Gradient field.
- Right-click the gradient setting.
- Select Convert to Variable.
- Give the variable a descriptive name, such as Brand Gradient.
Divi saves the gradient as a reusable variable.
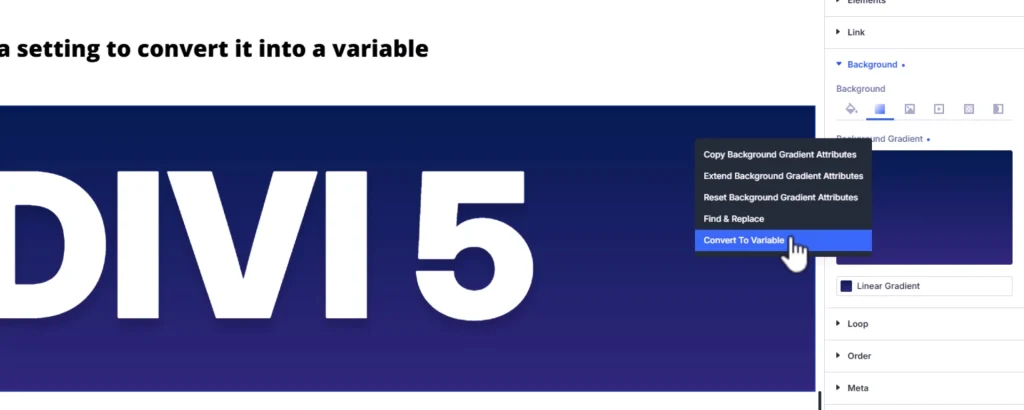
Now open the Variable Manager → Gradients.
You'll find your newly created gradient there.
You can apply this variable to other elements without rebuilding the gradient each time.
Even better, when you update the gradient variable, every element using that variable can update automatically.
Why it's useful: This shortcut saves time and helps you build a consistent design system across your website.
If you want to learn more about reusable design elements, check out my Divi 5 Components and Slots tutorial.
10. Generate Color Harmonies and Color Scales
The final feature is especially useful when you're designing a website from scratch or creating a consistent brand identity.
Divi 5 includes Color Harmony and Color Scale generators inside the Variable Manager.
These tools can automatically create coordinated color combinations and variations.
Generate a Color Harmony
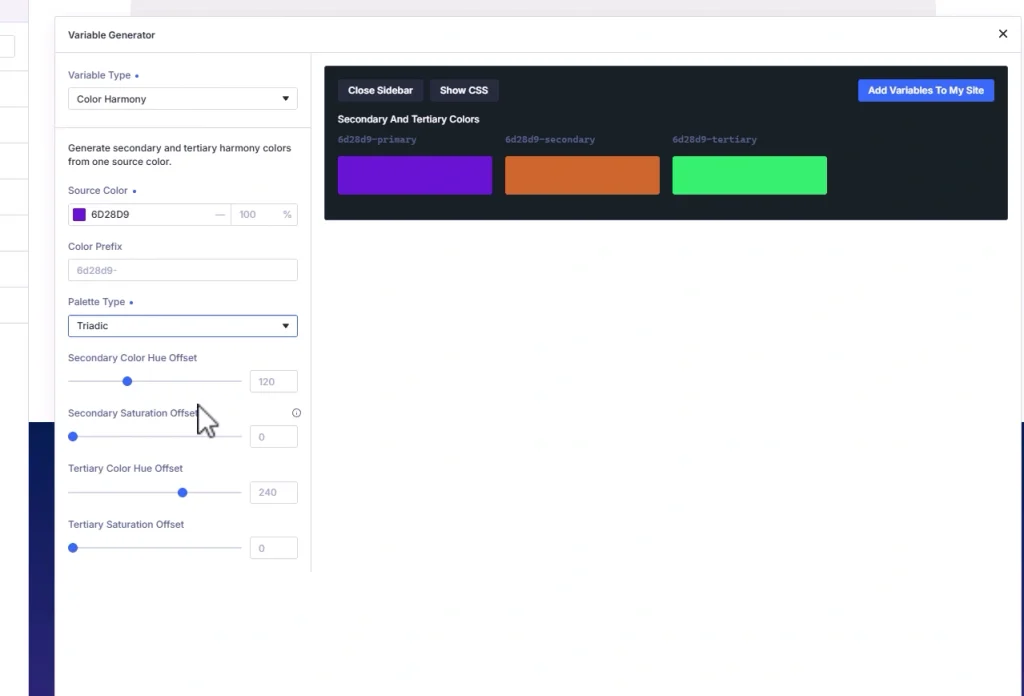
Open the Variable Manager and access the Variable Generator from the Colors section.
Select Color Harmony.
Choose a starting color and explore the available harmony options.
For example:
- Complementary creates colors based on opposite positions on the color wheel.
- Analogous creates colors with closely related hues.
- Triadic creates colors using three positions around the color wheel.
Divi generates matching color combinations that you can preview and customize.
This is useful when you're starting with a primary brand color and need additional colors for your website.
Generate a Color Scale
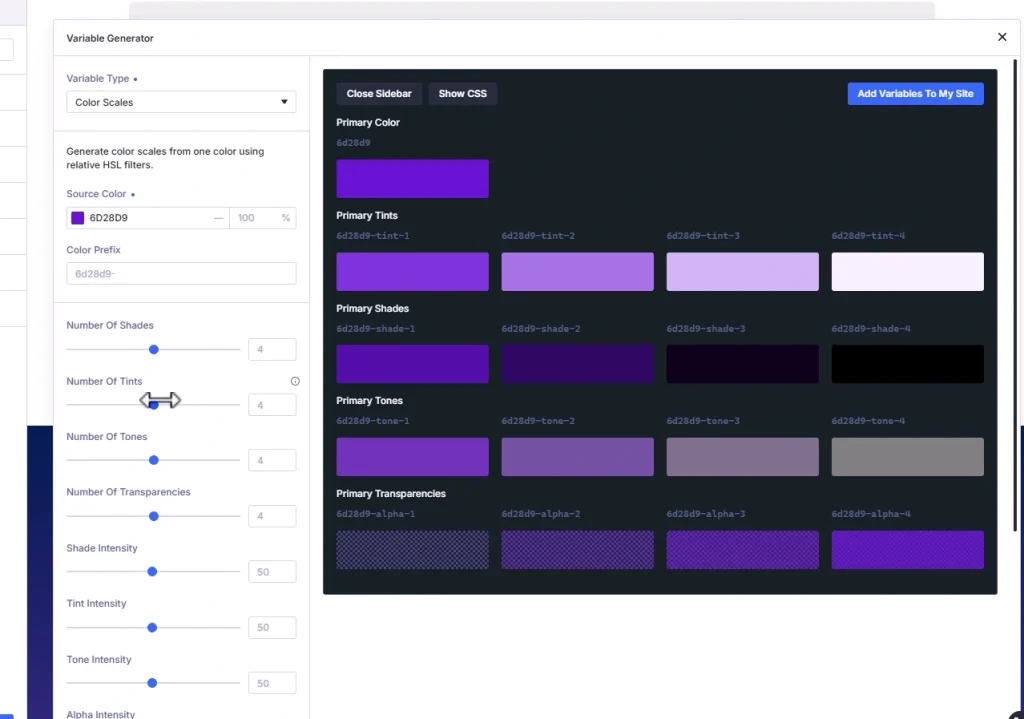
The Color Scale Generator works a little differently.
Instead of generating separate matching colors, it creates variations of one specific color.
For example, start with a purple color such as #6D28D9.
Divi can generate:
- Tints: Lighter variations of the original color.
- Shades: Darker variations.
- Tones: More muted variations.
- Transparencies: Different opacity levels.
You could use lighter colors for backgrounds, your primary color for buttons, and darker variations for hover effects.
Once you're happy with the generated palette, you can save the colors as Global Variables.
Why it's useful: You can build a more consistent color system without manually calculating every shade.
Frequently Asked Questions
Yes. All ten features covered in this tutorial are available through Divi 5's built-in Visual Builder settings.
You can create collapsible mobile menus, backdrop blur effects, custom text fills, image crops, and styled form fields without writing custom CSS.
Regular Blur softens the element itself, including its content. Backdrop Blur softens what's visible behind the element.
Backdrop Blur is especially useful for creating glass-like effects on transparent headers and overlays while keeping foreground text readable.
Set your desired Aspect Ratio under Design → Sizing.
Then go to Design → Framing and change Object Fit to Cover.
You can also adjust Object Position to control which part of the image remains visible.
Yes. Divi 5 supports Global Variables for gradients and colors.
You can create variables manually in the Variable Manager or convert supported existing settings into variables using the right-click menu.
When you update a variable, elements connected to that variable can update across your website.
This tutorial focuses specifically on Divi 5. Some effects may be achievable in Divi 4, but they may require different settings, custom CSS, JavaScript, or additional plugins.
Final Thoughts
Divi 5 continues to introduce useful improvements, and some of the smaller additions can make a big difference in your everyday workflow.
Personally, I particularly like the built-in collapsible mobile menu, backdrop blur, and the new text effects.
But practical improvements such as image framing, form labels, and the ability to convert settings into variables are equally valuable.
If you haven't tried these features yet, I recommend experimenting with them on a test page to see how they can improve your designs.
Which of these Divi 5 features did you already know about? Let me know in the comments.
Learn More About Divi 5
Want to continue learning?
Check out my free Divi 5 course for more tutorials and practical demonstrations.
You can also explore my collection of free Divi layouts, including resources created for Divi 5.
And if you're looking for ready-made Divi website designs to speed up your projects, take a look at my All Access Membership.