


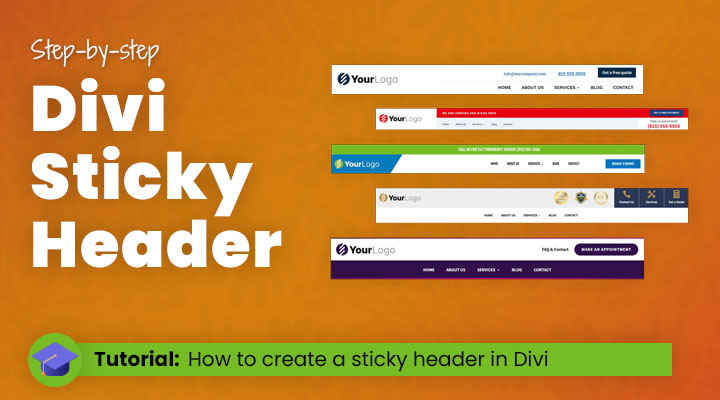
Struggling to figure out how to create a sticky header on your Divi website?
Look no further! This step-by-step tutorial will explain to you how to make the Divi header sticky in just 5 minutes or less without the need for any plugin or custom CSS code. I will be using the latest features of Divi (Divi’s sticky options).
Imagine having a sleek, eye-catching sticky header that shows off what makes your business unique—and being able to set it up with ease. With this tutorial, you will achieve that in just a few minutes—regardless of your experience level!
Table of contents
- What is a sticky header in Divi?
- Method 1: How to create a fixed header for the default Divi menu
- Method 2: How to create a sticky header in the Theme Builder
I will start with an introduction but you can also just skip that and start right away with the tutorial.
What is a sticky header in Divi?
A sticky or fixed Divi header is a web design aspect that enhances User Experience by holding the header or menu of a site still in place, even as the user scrolls down the webpage.
This feature makes it easier for users to navigate and access crucial information. Sticky headers are especially beneficial for websites with lengthy pages since they make the menu or navigation bar perpetually visible and accessible.
You can quickly jump to different sections of such sites without scrolling back to the page’s top. So, let’s consider the perks of using a Divi sticky header.
1. Improved User Experience
Using a sticky header will markedly improve the user experience, as visitors can navigate your website with ease. Keeping the menu or navigation bar fixed in place assists in discovering relevant information and mitigates bounce rates. Moreover, using the Divi sticky header enables the customization of the design and layout to match the overall aesthetic of the website, resulting in a cohesive look and feel.
2. Better Mobile Responsiveness
Websites need to adapt to the mobile era to stay relevant. With plenty of people using smartphones for internet surfing, it’s imperative to present a website that performs and appears flawlessly. This problem is addressed by the Divi sticky header that is primed for mobile, providing a streamlined and accessible interface for visitors who browse using mobile devices.
3. Customizable Design
Divi’s sticky header is a fantastic feature thanks to its high level of customization. Adjusting your website’s header layout and design in accordance with branding becomes easier using Divi.
Besides, the builder offers several header templates that you can personalize to make a unique one. Divi’s drag-and-drop builder makes incorporating menus, logos, search bars, and more into your sticky header straightforward.
4. Improved SEO
Keeping visitors engaged on your website can positively impact search engine optimization (SEO). Longer website visits signal to search engines that your website is valuable and relevant, which can improve your website’s search engine rankings and traffic. You can increase engagement on your website by using Divi sticky header options, leading to improved SEO and more visitors.
5. Easy to Use
The Divi sticky header is user-friendly, allowing you to create and customize it using the drag-and-drop builder – no coding required. Divi also provides a wealth of tutorials and resources for all designer levels to build a beautiful header for their website.
Method 1: How to create a fixed header for the default Divi menu
If you are using the default Divi menu and you want to make it fixed then go to Divi > Theme Options and enable “Fixed Navigation bar”.
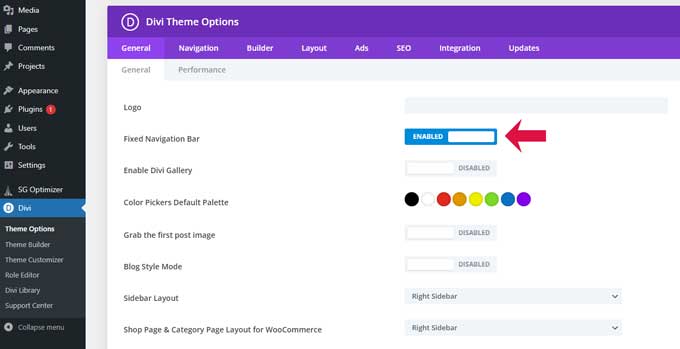
This will only work for the default Divi menu, if you have created a custom header in the Divi Theme Builder then you need to follow the steps in the second method below this one.
How to style the sticky menu
Go to Divi > Theme Customizer > Header & Navigation > Fixed Navigation Settings.
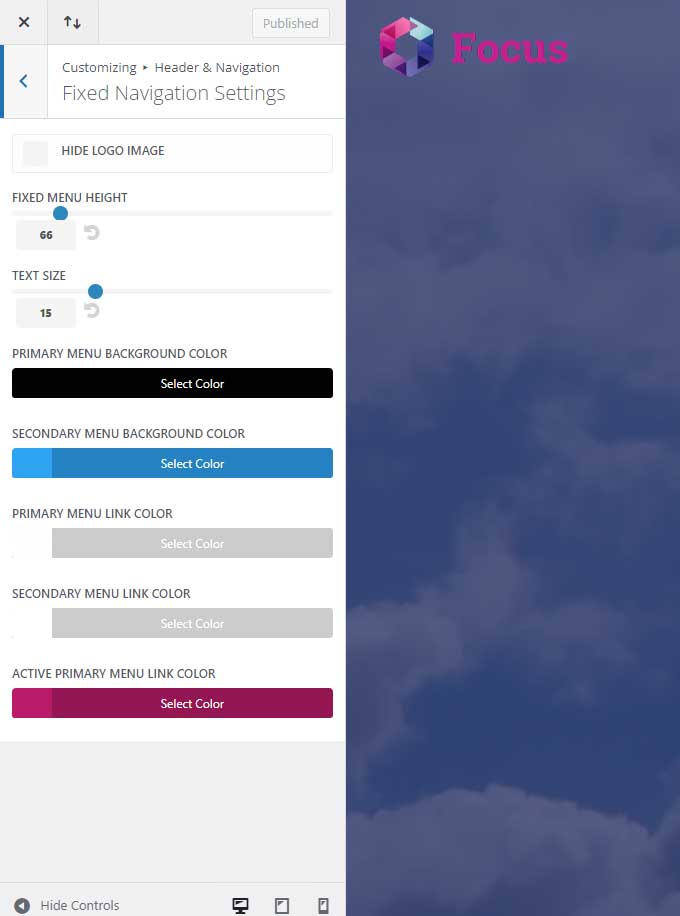
These are the settings for the menu when you are scrolling down. For example, you can change the background color of the menu when you start scrolling down or you can change the font size.
The options are limited for the default menu in Divi. If you want more options then you have to create a custom header/menu in the Theme Builder.
Method 2: How to create a sticky header in the Theme Builder
With the first method, you can only make the default Divi menu fixed but if you want to make your entire Divi header fixed then this method is for you.
If you have created a custom header in the Theme Builder and want to make it a fixed header then the option “Fixed Navigation bar” in the Theme Options will not work.
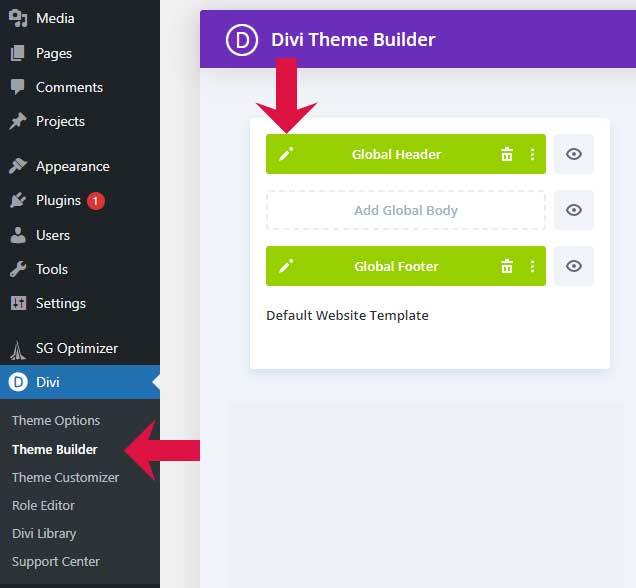
If you do not know how to create a Global Header then follow this tutorial “How to Create a Custom Divi Header“. This tutorial will explain how you can create a custom Divi header and menu.
Start by navigating to the Global Header.
Open the section that you want to make sticky. From here go to the Advanced tab and scroll down to Scroll Effects.
Under Sticky Position, you can set to Stick to Top.
Your header will
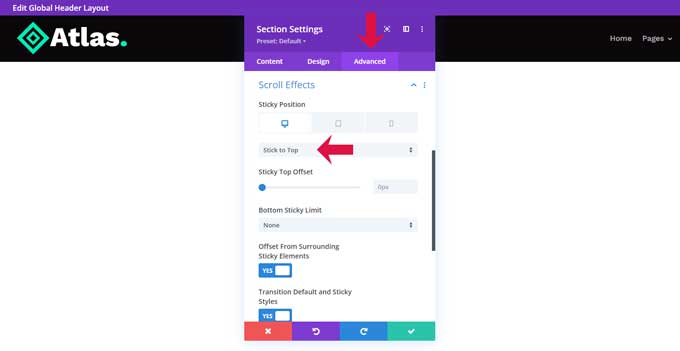
The entire section will now stick to the top. With the “Stick Top Offset” option, you can set a value for the distance between the browser window and the sticky section.
How to style the Divi sticky header
Now that the Divi sticky options are enabled for this section there will be a new tab visible (sticky style adjustment) for each element in this section, this also includes all the rows and modules in this section.
For example, the font size for the menu module now has a sticky elements tab. This means you can change the font size when the header gets fixed.
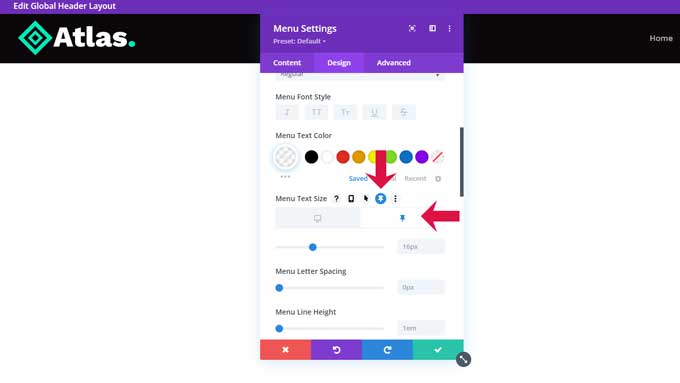
You can do this for any element, so your design possibilities are limitless.
You can also make Divi header transparent by setting the background opacity to 0.
You can follow this great tutorial by Elegant Themes for styling a sticky header in Divi:
Conclusion
In conclusion, a sticky header is an important design element to consider when creating or updating your website. Putting the time and effort into making sure it looks perfect and works as intended will go a long way in providing a better experience for viewers, not to mention aiding in the overall success of the site.

Luar biasa disini yang anda berikan sangat luar biasa ! Saya masih pelajar banyak ilmu yang saya ambil disini. Terimakasih Om..hendriksen
Thank you very much, Putra.