


Divi Cloud is the perfect solution for busy Divi builders who want to keep their layouts and favorite elements perfectly organized. With this step-by-step guide, you’ll be able to set up your own cloud in minutes!
For Divi users, managing multiple websites and their content can feel like a chore. But with the help of Divi Cloud, it’s as easy as ever! Think of it like Dropbox for your amazing Divi sites – just click to transfer page layouts, sections, rows, and modules onto any website in no time flat. Get ready to make life simpler – load up on convenience today when you use this powerful cloud solution!
Divi Cloud is here to make your life easier! With the click of a button, you can load page layouts, sections, rows, and modules directly from your Cloud onto any website.
In this step-by-step guide, we’ll walk you through the setup and use of Divi Cloud.

Table of Contents
- What is Divi Cloud?
- How to use Divi Cloud step-by-step
- What can you save in the Divi Cloud?
- Core features of Divi Cloud
- Divi Cloud Roadmap
- Divi Cloud Membership Pricing
- Faq
What is Divi Cloud?
Divi Cloud saves all your Divi layouts, allowing you to access and use them anywhere while logged in allowing you to work on any Divi project with your pre-built templates, optimized images, and essential tools.
Not only that, but these saved layouts can be accessed from anywhere where you’re logged in – allowing you to work on any Divi project with your pre-built templates, optimized images, and essential tools.
Difference between local and cloud
The difference between saving Divi Builder elements locally and cloud is quite straightforward. When you save to your local environment, you’re saving items to a specific website, where it will only live and be accessible from that website.
Saving elements to the cloud effectively allows you to access those saved design elements across any Divi website associated with your Divi account.
How to use Divi Cloud step-by-step
You need to have an active Elegant Themes Membership in order to have access to Divi Cloud and your Divi theme needs to be up to date.
Step 1: Access the Divi Cloud
To gain access to Divi Cloud, simply enable the Visual Builder on any page and follow these simple steps:
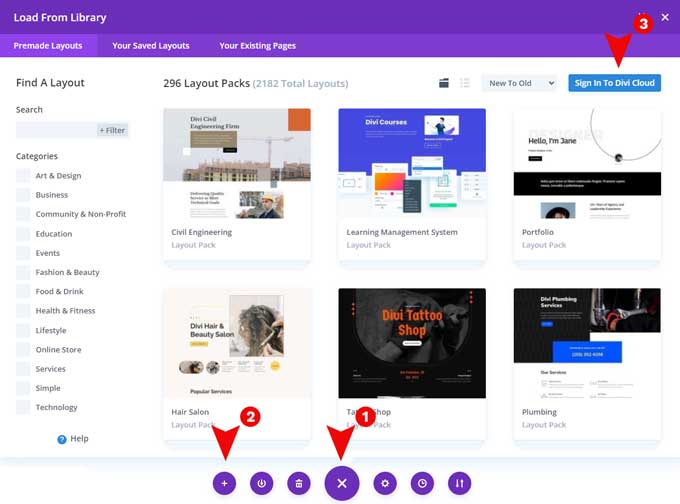
- To access the Divi Library, click on the “+” icon located at the bottom of Divi’s toolbar.
- Look up in the top right corner and you’ll discover a blue button that reads “Sign In To Divi Cloud”. When clicked, this will generate a pop-up window where you can enter your details to log into your Elegant Themes Account.
- When signed in, your session is stored for 30 days, so you can quickly access your Cloud without needing to log back in constantly.
Step 2: Save a layout, section, row, or module to the Divi Cloud
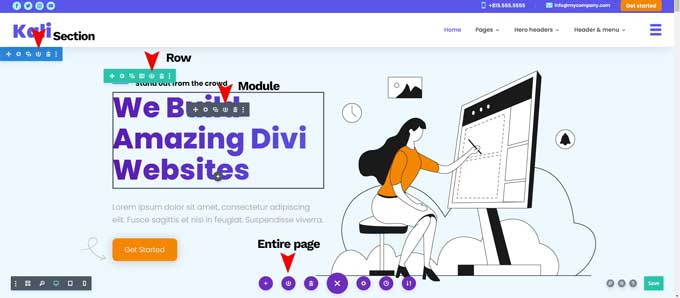
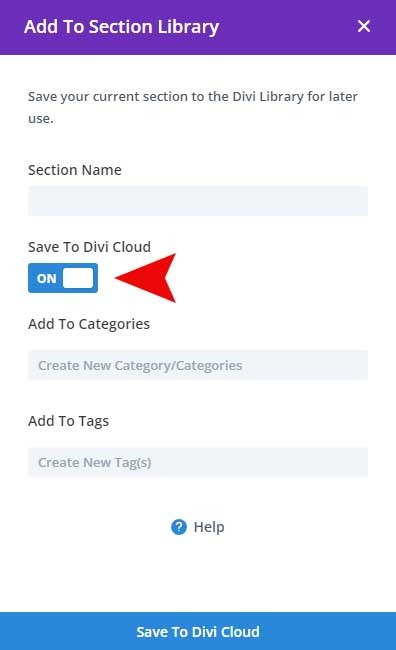
You can save your entire page, section, row, or module just like you save it to the Divi Library. Click on the save to library icon and add your element to the Divi Library.
But this time you’ll notice a new Save To Divi Cloud option when adding it to the library interface.
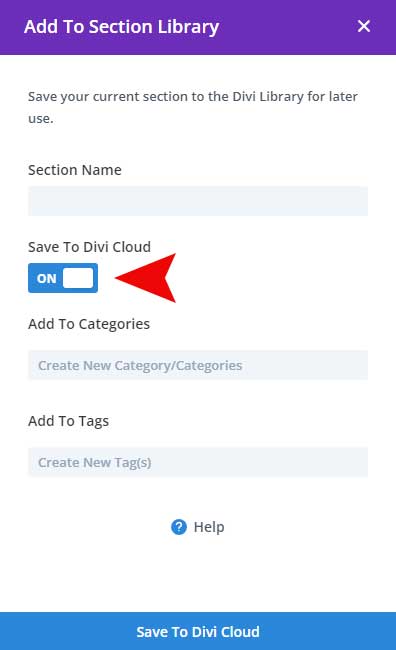
By enabling this toggle you will get options to add categories and tags for easier organization.
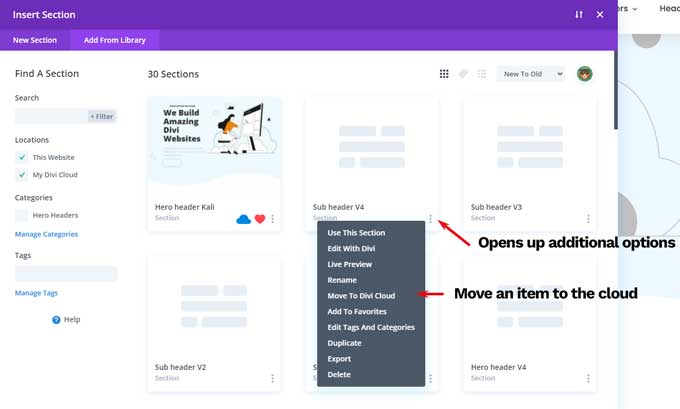
Add existing items to the Divi Cloud
With just a few simple steps, you can easily add existing items to the Divi Cloud. In the visual builder, head over to the Add From Library tab and ensure “This Website” is selected in locations. Then click on any saved item’s 3 dots for additional options – from there simply hit ‘Move To Divi Cloud’ and your item will be added to the cloud.
Step 3: Load a layout
To load a saved layout into your page click on the + icon of the section, row, or module. If you want to import an entire page then click on the + icon of the toolbar.
Then click on the Add From Library tab.

This will bring you to the Divi Library window. On the left, you can search for locations on This Website or My Divi Cloud and you can search for categories.
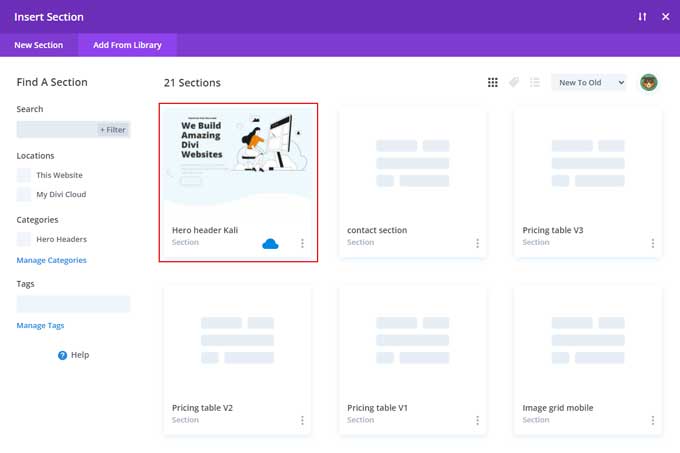
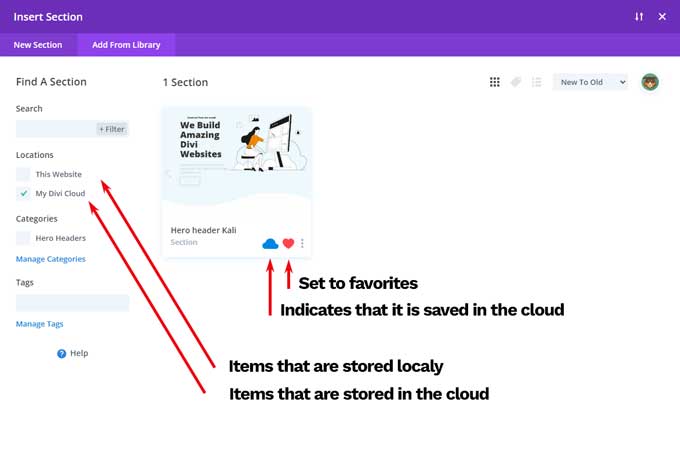
When saving Divi layouts, sections, rows, or modules to the Divi Cloud, you will notice a blue cloud icon. This indicates that the item is saved in the Divi Cloud, instead of just being stored locally.
Along with this icon, Divi users will also notice a screenshot of their saved layout. These screenshots are automatically created by Divi.
Now you just have to click on your layout and it will be placed on your page.
Step 4: Organizing your Divi Cloud layouts
Organize your Divi Cloud items into easy-to-navigate categories, folders, and favorites within the Visual Builder so that you can with ease manage them!
With the Visual Builder, you can effortlessly manage your entire Divi Cloud library. You have full control over every aspect of it – from saving and editing to deleting, restoring, renaming, copying, and even previewing layouts! Categorizing them into folders makes it easier for you to find what you’re looking for quickly so that you don’t need to leave the builder page at all when building something new.
What can you save in the Divi Cloud?
You can add Divi Layouts, sections, rows, modules, and Theme Builder templates to your Divi Cloud library with ease! Not only that–you have the capacity to save content from existing pages you are building as well as sync items directly from your local Divi Library. Plus, it’s just a few clicks away for you to bulk upload all of your exported layouts into the cloud.
Core features of Divi Cloud
Divi Cloud offers a number of great features to make it easier for developers and designers to work with Divi. Some of the features are:
Unlimited Cloud Storage
Divi Cloud comes with unlimited usage. You can save as many items in the cloud as your desire.
Safe & Secure
Divi Cloud requires authentication in your browser using your Elegant Themes username and password so that you can use it for any website without needing to share access with clients or the actual site.
Browse Visually
Divi Cloud makes finding your Divi layouts simple and efficient by automatically taking a screenshot of them and storing it in the cloud. This allows you to quickly browse through an organized list without wasting time searching for your desired layout!
Organize Your Divi Library
Get easy access to your Divi Cloud items with the Visual Builder! No more endless searching for Divi layouts – they’re always right at your fingertips. This makes page-building a breeze, streamlining the process and allowing you to create beautiful designs in no time.
Save code snippets
Divi Cloud makes it easy for you to store all your favorite code snippets and quickly apply them when starting a new website. This convenient feature within Divi’s code editors allows you to customize as much or as little of the site build, ensuring exactly what you need is there at your fingertips!
Divi Cloud Roadmap
Elegant Themes has a roadmap for Divi Cloud, and there are quite some new features on the horizon. Here is a brief overview of what is coming out.
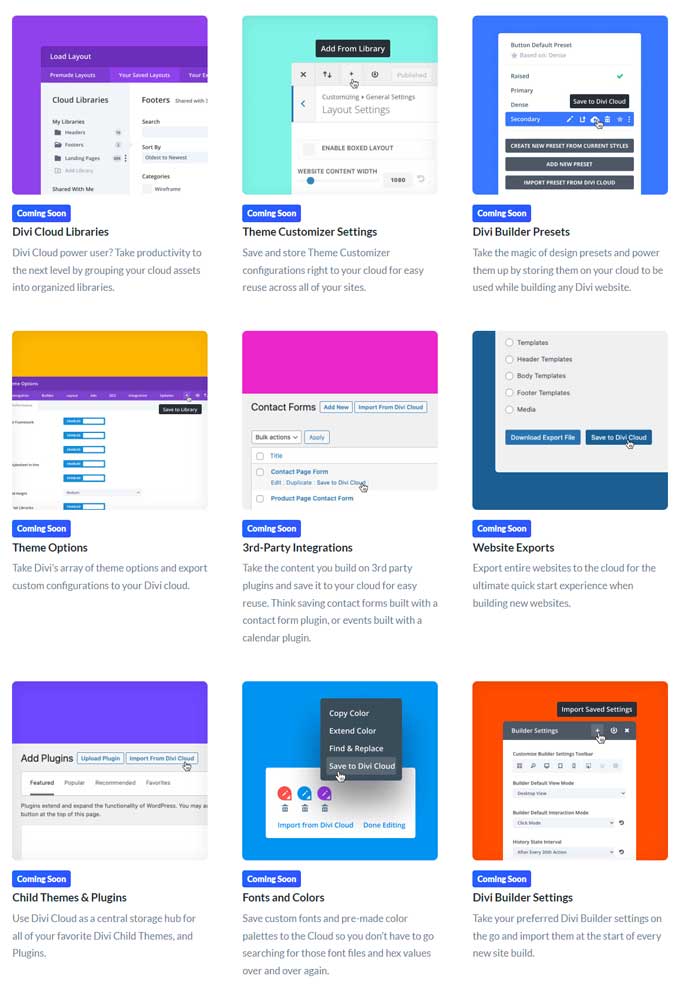
Divi Cloud Libraries
Take your Divi Cloud user experience to the next level by organizing and categorizing all of your cloud assets into libraries! Streamline productivity with this incredibly useful feature.
Theme Customizer Settings
Keep your Theme Customizer configurations safe and conveniently stored in the cloud, ready to be reused on all of your sites.
Divi Builder Presets
Unlock your design capabilities with Divi’s cloud presets, and bring a little magic to every website project you create! Make the most of your time in web development by quickly accessing all of your best creations.
Theme Options
Take advantage of the wide variety of Divi theme options and effortlessly export your custom configurations to your cloud storage.
3rd-Party Integrations
Make your life easier by preserving the content you create on third-party plugins to the Divi Cloud. This could involve saving contact forms created using a contact form plugin, or events planned with an event calendar plugin. Reusing this information will make it far simpler to manage your website in the future!
Website Exports
Export entire websites to the cloud for optimized efficiency when constructing new sites. With just one click, you can launch a fully functional website and begin customizing it right away!
Child Themes & Plugins
Divi Cloud is the ultimate destination to store your favorite Divi Child Themes and Plugins – quickly access them all in one convenient spot!
Fonts and Colors
With Cloud storage, you can store your custom fonts and pre-made color palettes so that you don’t have to go hunting for those font files and hex values every single time.
Divi Builder Settings
Bring your favorite Divi Builder settings with you and easily import them into each new project.
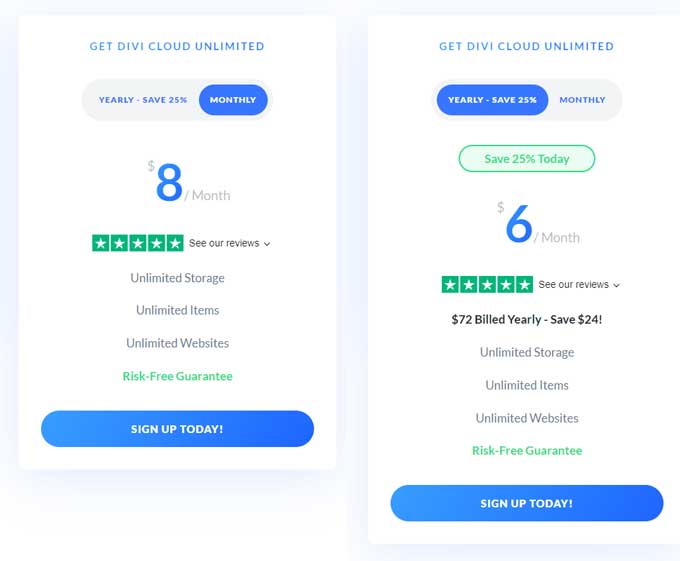
Divi Cloud Pricing
With an active Elegant Themes Membership, all users have access to Divi Cloud – storage space that can store up to 50 items at no additional cost.
This is a great way to try Divi Cloud for free!
If that is not enough for you then you can get the premium plan which comes with unlimited storage, unlimited items, and unlimited websites. This plan cost $8 per month or a yearly rate of $6 a month! (billed yearly at $72).
You can check this page if there is any official Divi discount code available for Divi Cloud.
Faq
Step 1: To gain access to Divi Cloud, open any page, and activate the Visual Builder.
Step 2: To access your Divi Library, click the ” +” icon at the bottom of your Divi toolbar.
Step 3: At the upper right side of your screen, you will come across a vibrant blue button that reads “Sign In To Divi Cloud”. Upon pressing it, a small window will appear; simply enter your account details to successfully log in and get access to the Divi Cloud.
Currently, Divi users can store up to 50 items on their Cloud at no cost. With Divi Cloud premium, users get unlimited storage, items, and website exports for a monthly or yearly rate.
Divi Cloud is free for the first 50 items, so you can try it out for free. With the premium version users get unlimited storage, items, and website exports for a monthly rate of ($8) or a yearly rate of ($72).
Conclusion
Divi Cloud is the perfect solution for Divi builders who want to save time and effort managing their website content. Not only does it store page layouts, sections, rows, and modules in a single place but it also allows you to sync all your sites as well!
It’s the ultimate time saver for any busy individual! So if you’re looking for an innovative way to speed up your work while keeping everything perfectly organized and updated – then give Divi Cloud a try.

Will you be making an easy way for your all access members to upload your layouts to our clouds? Thanks!
Hi Declan,
Yes, that will come in the future.
Nice solution, but can you, for example, sell access to my cloud to other people? I would like to give access with individual login and password to the cloud to other people, can this be done?
Hi Kamila,
I don’t think you can do that but you should ask Elegant Themes to be sure.
Ok, thank you for information 🙂